1 Getting started
1.1 Prerequisites
Minimum system requirements:
- Windows 10, macOS 10.13 High Sierra, or Ubuntu 20.04 LTS;
- 20 GB of storage space, plus additional storage for model outputs;
- 128 GB RAM to run the model over the full area (less for sub-areas);
- High-speed internet connection.
The following section provides details on installing prerequisite software for running LandWeb.
1.1.1 Docker
Due to idiosyncratic difficulties of installing multiple pieces of software and ensuring the correct versions are used throughout, we provide prebuilt Docker images, which better provides a consistent and reproducible software environment for running the model.
Thus, using these images are preferred over ‘bare-metal’ installation.
If you prefer to not use Docker, skip this subsection.
Install Docker for your system following https://docs.docker.com/get-docker/.
Next, pull the image from Docker Hub:
And launch a new container based on this image (adjusting PASSWORD, memory, and cpus as needed):
docker run -d -it \
  -e GITHUB_PAT=$(cat ${HOME}/.Renviron | grep GITHUB_PAT | cut -d '=' -f 2) \
  -e PASSWORD='<mySecretPassword>' \
  --memory=128g \
  --cpus=32 \
  -p 127.0.0.1:8080:8787 \
  --name LandWeb \
  achubaty/landweb-standalone:latest
Once the container is running, open your web browser and go to localhost:8080.
Log in to the Rstudio session as user rstudio and password <mySecretPassword> (change this password when launching container above).
Once finished, you can stop and destroy the container:
1.1.2 Bare metal installation
1.1.2.1 Development tools
1.1.2.1.1 Windows
-
Download
Rtoolsversion 4.2 from https://cran.r-project.org/bin/windows/Rtools/rtools42/rtools.html and install it as administrator.Rtoolsprovides the necessary compilers etc. to build and install R packages from source on Windows.- During installation, be sure to check the option to add
Rtoolsto yourPATH.
- During installation, be sure to check the option to add
Download and install a proper text editor, e.g.
Notepad++(https://notepad-plus-plus.org/downloads/).
1.1.2.1.2 macOS
1.1.2.1.2.1 Xcode command line tools
To build software, you will need the Xcode command line tools1, which include various compilers and git version control software.
1.1.2.1.3 Ubuntu Linux
sudo apt-get update

sudo apt-get -y install \
    build-essential \
    biber \
    ccache \
    cmake \
    curl \
    libarchive-dev \
    libcairo2-dev \
    libcurl4-openssl-dev \
    libgit2-dev \
    libglpk-dev \
    libgmp3-dev \
    libicu-dev \
    libjq-dev \
    libmagick++-dev \
    libnode-dev \
    libpng-dev \
    libprotobuf-dev \
    libprotoc-dev \
    libssh2-1-dev \
    libssl-dev \
    libxml2-dev \
    libxt-dev \
    make \
    p7zip-full p7zip-rar \
    pandoc pandoc-citeproc \
    protobuf-compiler \
    qpdf \
    screen \
    sysstat \
    texinfo texlive-base texlive-bibtex-extra \
    texlive-fonts-extra texlive-latex-extra texlive-xetex \
    wget \
    xauth \
    xfonts-base \
    xvfb \
    zlib1g-dev
1.1.2.2 Geospatial libraries
In order to work with geospatial data, recent versions of GDAL, PROJ, and GEOS geospatial libraries need to be available on your system.
1.1.2.2.1 Windows
No additional should be needed, as recent versions of R geospatial packages include pre-bundled versions of GDAL, PROJ, and GEOS.
1.1.2.2.3 Ubuntu Linux
The default Ubuntu 20.04 LTS package repositories ship older versions of the geospatial libraries we will be using, so we will need to to add some additional repositories to get the latest versions.
Install additional system dependencies that serve as prerequisites for running the LandWeb model in R.
sudo apt-get -y install \
    gdal-bin \
    libgdal-dev \
    libgeos-dev \
    libproj-dev \
    libudunits2-dev \
    python3-gdal
Optionally, we install mapshaper geospatial library which is used to speed up polygon simplification.
1.1.2.3 Version control
git is the version control software used throughout this project, and is required to ‘checkout’ specific versions of the code as well as to make changes and ‘push’ these changes to the model code repository.
- Install the latest version of
gitfrom https://git-scm.com/downloads or via your package manager.
Windows users should install as administrator.
Use nano (instead of vi/vim) as the default text editor.
For all other choices, use the recommended settings.
For macOS users, git is included with the Xcode command line tools.
- Create a GitHub (https://github.com) account if you don’t already have one, and configure a Personal Access Token (PAT).
A GitHub (https://github.com) account is required to assist with package installation and accessing model code.
Several packages used by LandWeb are only available on GitHub. Because we will be installing several of these, we want to ensure we can do so without GitHub rate-limiting our requests. Without a PAT, some packages may temporarily fail to install, but can be retried a little later (usually 1 hour).
Create a GitHub Personal Acess Token (PAT):
either ‘manually’ following the instructions2, making sure to check the
repo,workflow, anduser:emailscopes;
- or directly from an R session:
```r
# install.packages("usethis")
usethis::create_github_token()
```-
Securely store this token using the credential store, from an R session:
Storing GitHub credentials in .Renviron is no longer recommended.
See https://usethis.r-lib.org/articles/git-credentials.html.
-
Optional. Install the latest version of
GitKrakenfrom https://www.gitkraken.com/download/.
The free version is sufficient to access the public repositories used in this project. However, the paid pro version is required to access private repositories.
1.1.2.4 R and Rstudio
- Download and install R version 4.2.3.
Windows
- Download R from https://cran.r-project.org/bin/windows/base/old/4.2.3/R-4.2.3-win.exe;
- Install R as administrator.
macOS
- Install
rig(https://github.com/r-lib/rig) to manage multiple R installations.
brew tap r-lib/rig
brew install --cask rig

rig install 4.2.3

## start Rstudio using a specific R version:
rig rstudio ~/GitHub/LandWeb.Rproj 4.2.3
Ubuntu Linux
Use rig (https://github.com/r-lib/rig) to easily manage multiple R installations, and easily switch among them.
- Add the
aptrepository and installrig:
## add apt repository
sudo curl -L https://rig.r-pkg.org/deb/rig.gpg -o /etc/apt/trusted.gpg.d/rig.gpg
sudo sh -c "echo 'deb [arch=amd64] http://rig.r-pkg.org/deb rig main' > /etc/apt/sources.list.d/rig.list"

## install (NB: rig is different package; use r-rig!)
sudo apt update
sudo apt install r-rig- Install R version 4.2.3
- Download and install the latest version of Rstudio from https://www.rstudio.com/products/rstudio/download/.
Windows users should install Rstudio as administrator.
-
(optional) On Linux, configure
ccacheto speed up R package re-installation and updates3.## configure ccache for R package installation mkdir -p ~/.ccache mkdir -p ~/.R { echo 'VER='; \ echo 'CCACHE=ccache'; \ echo 'CC=$(CCACHE) gcc$(VER)'; \ echo 'CXX=$(CCACHE) g++$(VER)'; \ echo 'CXX11=$(CCACHE) g++$(VER)'; \ echo 'CXX14=$(CCACHE) g++$(VER)'; \ echo 'FC=$(CCACHE) gfortran$(VER)'; \ echo 'F77=$(CCACHE) gfortran$(VER)'; } >> ~/.R/Makevars { echo 'max_size = 5.0G'; \ echo 'sloppiness = include_file_ctime'; \ echo 'hash_dir = false'; } >> ~/.ccache/ccache.conf
1.2 Getting the code
All modules are written in R and all model code was developed collaboratively using GitHub (https://github.com), with each module contained in its own repository. Code that is shared among modules was bundled into R packages, and hosted in on GitHub repositories. All package code is automatically and regularly tested using cross-platform continuous integration frameworks to ensure the code is reliable and free of errors.
1.3 Project directory structure
Model code is organized by the following directories and summarized in the table below.
NOTE: it may be useful to store data in a different location, but to map this location back to the e.g., cache/, inputs/, and/or outputs/ directories using symbolic links.
See R’s ?file.link to set these up on your machine.
| directory | description |
|---|---|
| R/ | additional R helper scripts |
| batch_runs/ | scripts for running multiple simulations |
| box/ | contains LandWeb config, used by the ‘box’ package |
| cache/ | all per-run and per-study area cache files stored here |
| docker/ | Dockerfiles, scripts, and documentation |
| docs/ | rendered model and app documentation |
| inputs/ | all model data inputs stored here |
| m/ | module code (git submodules) |
| manual/ | raw files for generating documentation manual |
| outputs/ | all per-run model outputs stored here |
| renv/ | project package management directory |
1.4 Updating the code
After having cloned the LandWeb code repository, users can keep up-to-date using their preferred graphical git tools (e.g., GitKraken) or from the command line.
1.4.1 Using GitKraken
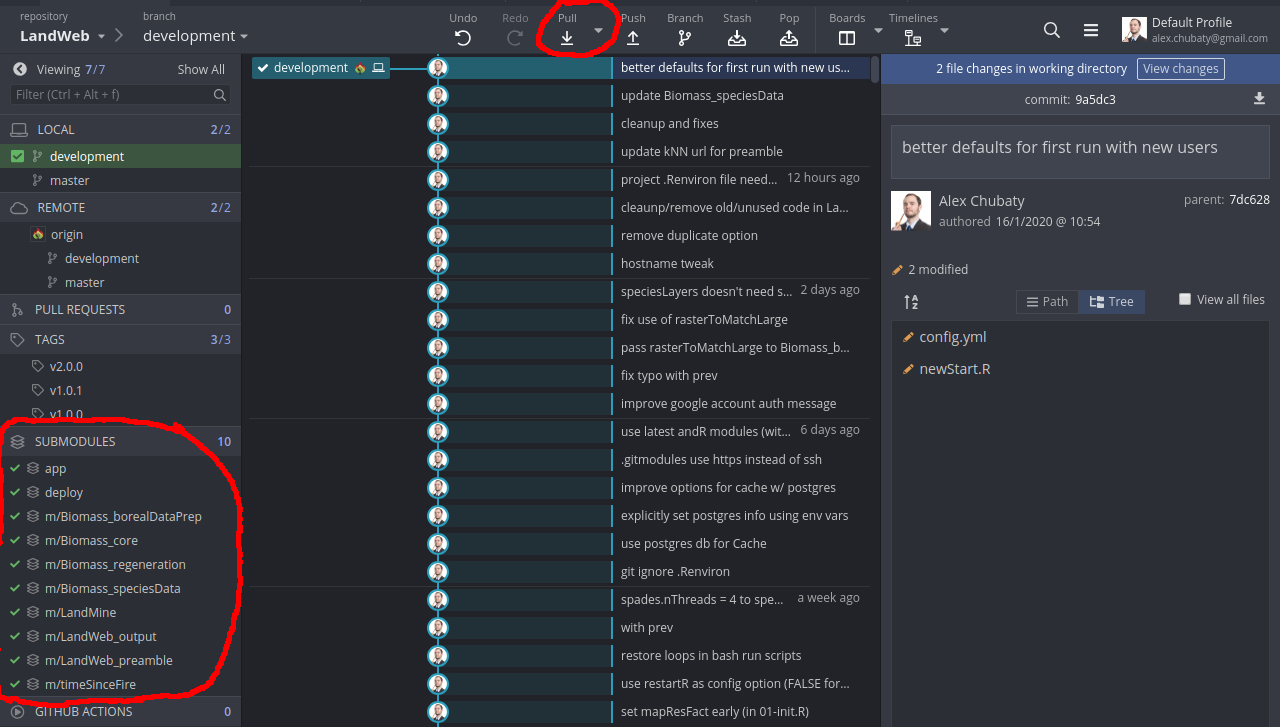
Figure 1.1: Screenshot showing showing code commits in Git Kraken. The submodules pane is highlighted on the bottom left.
Open the LandWeb repo, and after a few moments you will see the commit history update to reflect the latest changes on the server.
‘Pull’ in the latest changes to this repo, noting that the status of the git submodules (left hand side) may change.
If any submodules have changed status, for each one, right-click and select ‘Update
’.
1.5 Data requirements
In order to access and use the proprietary data in LandWeb simulations, you will need to be granted access to the shared Google Drive directory.
During first-run of the model, all required data will be downloaded to the inputs/ directory.
To request access, please contact Alex Chubaty (achubaty@for-cast.ca).